As you probably know, the data-science world is at war: half of it uses Python, the other half R. The Internet is full of comparisons and long discussions. However, all of this becomes irrelevant when your data becomes Big. The first road bump occurs when your data don’t fit in your laptop’s memory anymore. What do you do then? My advice is: rent a machine with more memory on one of the cloud platforms. If your data are Really Really Big (think terabytes) and, like me, you have a soft spot for parallel computing and clusters, you can try Apache Spark.
Spark was developed as a response to the limitations of Hadoop’s MapReduce. In particular, Spark is much better for iterative algorithms, and most machine-learning algorithms belong to this class. This made it a great platform to develop distributed versions of many machine-learning algorithms. Currently, Spark’s machine-learning library contains all common algorithms and many other tools useful when training machine-learning models: common feature transformations, evaluation functions and machine-learning pipelines.
This post will give a short overview on how to get started with machine learning in Spark.
All code in this post in available on GitHub in my TalkingData repository.
GETTING STARTED
This example was written in Scala – the default Spark language. However, if you prefer Python, you can easily translate this code to use the PySpark API instead.
To get started, first create a new Scala project in your favourite IDE. For example, in IntelliJ select New Project -> SBT. Make sure to select Scala 2.11.. Spark doesn’t work very well (at this moment) with Scala 2.12.. Add Spark dependencies to your ‘build.sbt’ file:
scalaVersion := "2.11.12"

libraryDependencies ++= Seq(
  "org.apache.spark" %% "spark-core" % "2.2.1",
  "org.apache.spark" %% "spark-sql" % "2.2.1",
  "org.apache.spark" %% "spark-mllib" % "2.2.1"
)
Now you can create you application stub:
In IntelliJ, right-click somewhere in the ‘src’ tree and select New -> Scala Class. Set kind to ‘Object’ and type this code:
import org.apache.spark.sql._
import org.apache.spark.ml.feature.VectorAssembler
import org.apache.spark.ml.classification._
import org.apache.spark.ml.evaluation._
import org.apache.spark.mllib.evaluation._
object app {
  // Create a Spark session object
  lazy val spark: SparkSession = {
    SparkSession
    .builder()
    .master("local")
    .appName("YourAppName")
    .getOrCreate()
  }
  spark.sparkContext.setLogLevel("WARN")
  def main(args: Array[String]): Unit = {
    // our ML code will go here
  }
}
In the above code snippet, we have created a Scala application. We told it to import various Spark libraries that we will be using in our project. We have created the so-called Spark Session – the main entry point to Spark functionality. Note the master("local") line, in which we tell Spark that we will be running it in a local mode – i.e. all tasks will be running on your local machine. Later we will change this line to let Spark jobs run on a cluster. Finally we changed Spark’s log lever to ‘WARN’ (on the default ‘INFO’ level, Spark generates a lot of output).
LOADING DATA
For this example, I will use the data from Kaggle’s TalkingData competition. This dataset was provided in the CSV format which can be easily loaded into Spark:
    // Create a schema
    val trainSchema = StructType(
      StructField("ip", IntegerType, nullable = false) ::
      StructField("app", IntegerType, nullable = false) ::
      StructField("device", IntegerType, nullable = false) ::
      StructField("os", IntegerType, nullable = false) ::
      StructField("channel", IntegerType, nullable = false) ::
      StructField("click_time", TimestampType, nullable = false) ::
      StructField("attributed_time", TimestampType, nullable = true) ::
      StructField("is_attributed", IntegerType, nullable = true) ::
      Nil
    )

    // Load the data with the given schema
    val train  = spark.read
      .option("header", "true")
      .schema(trainSchema)
      .csv("/Users/chosia/codersco/TalkingData/data/train_sample.csv")
Note that before actually loading the data, I’ve created a schema for this dataset. This step is not strictly necessary, however if I skip it, Spark will interpret all columns in the dataset as String columns
PREPROCESSING DATA
Once you’ve loaded the data, you can use Spark to preprocess it and create features. Personally, I like to use the good old SQL, which you can run directly on top of Spark data frames. First, you have to give your data frame a ‘table name’, which will be used in the SQL queries to refer to this data frame. Here we will call our table ‘train’:
train.createOrReplaceTempView("train")After that, you can write SQL queries to transform your data frame:
val features = spark.sql(
  """
    select ip, app, device, os, channel, hour(click_time) as hour, is_attributed
    from train
  """.stripMargin
)
In this example, I didn’t do any advanced transformations: I have only extracted the hour from the ‘click_time’ column. But you can easily use SQL to create more advanced features: click frequencies per IP address, etc.
TRAINING A MODEL
Once we got our features, we can train our model. Spark ML contains many machine-learning algorithms, from linear regression to some simple neural networks. For this problem, we will use Gradient Boosted Trees. Before we can feed our data to the algorithm, though, we need to perform one more transformation to get the data into the format required by this algorithm: we need to put all the feature columns into one vector column, so that our dataset looks like this:
| features | label |
|---|---|
| [1,2,3,4,5,6] | 0 |
| [6,4,3,2,1,2] | 1 |
To achieve this, we use the “VectorAssembler” class:
// Create a list of all column names, except "is_attributed"
val feature_cols = features.columns.diff(List("is_attributed"))
// Create a vector assembler
val assembler = new VectorAssembler().setInputCols(feature_cols).setOutputCol("features")
// Transform the dataset
val full_model_input = assembler.transform(features)
Now, we can create our model object, and tell it which column to use as features and which as target label:
val classifier = new GBTClassifier().setLabelCol("is_attributed").setFeaturesCol("features")As you can see, I’ve also added some timing information to measure how long the fitting took. This is typically the most time consuming part of the computation.
VALIDATING THE MODEL
Now we will use the remaining 30% of the data to validate the model. Spark ML contains many built-in metrics. Here, we will use the area under ROC metric which is typically used to validate binary classification models.
val model_output = model.transform(test)

val validator = new BinaryClassificationEvaluator()
  .setMetricName("areaUnderROC")
  .setLabelCol("is_attributed")

// Compute AUC
val auc = validator.evaluate(model_output)
println(s"Model AUC is: $auc")
For this problem, I would also like to compute confusion matrix. Unfortunately Spark ML doesn’t offer this functionality yet. The lower-level, RDD-based Spark MLlib does. To be able to use that API, however, we will need to transform our data frames into RDDs:
// Compute confusion matrix
val predictionsAndLabels = model_output.select("prediction", "is_attributed").rdd
      .map(row => (row(0).asInstanceOf[Double], row(1).asInstanceOf[Int].toDouble))
val metrics = new MulticlassMetrics(predictionsAndLabels)

println(metrics.confusionMatrix.toString())
That’s it folks, we’re done coding. You can press “Run” in your favourite IDE and see how your data gets transformed and your model gets trained and validated. If you have a lot data, though, chances are they you’re will have to wait a lot of time.
PREPARING THE APPLICATION TO RUN ON A CLUSTER
Chances are that you got a little impatient waiting for you model to be trained on your local machine. Luckily, we can speed things up by using a cluster. There are only few things you need to do in order to run your app on a cluster:
1. Change Spark master to YARN
You need to tell your Spark library that rather than running on a local machine you want to use the cluster and you want to use YARN (Hadoop’s job scheduler and resource manager) to schedule your jobs. Simply change this line:
.master("local")to this:
.master("yarn")2. Make your data accessible to cluster nodes
The cluster nodes are separate machines and won’t be able to read data from your local filesystem. If you’re running on your local Hadoop cluster, you can put your files in HDFS and refer to them from your code using an HDFS URL, for example “hdfs://talkingdata/train.csv”. However, in this example, we will be running on a cluster in AWS and the simplest solution is uploading your files to an S3 bucket. Simply go to the S3 service in your AWS console, create a bucket with some nice name (mine is called ‘coderscotalkingdata’ and upload your data files there. Now you can tell Spark to read the files from this location rather than from your local filesystem:
val train  = spark.read
      .option("header", "true")
      .schema(trainSchema)
      .csv("s3://coderscotalkingdata/train.csv")
3. Package your application
The last step is packaging your application into a JAR file so that you can easily upload it to the cluster and submit to Spark. You can do it using SBT. In your terminal go to the directory containing your Scala application (where your build.sbt lives) and type:
sbt packageYou will find your JAR file in the
target/scala-2.11/subdirectory.
SPINNING UP AN AWS EMR CLUSTER
In the era of cloud computing, we don’t have to build a cluster ourselves, but we can rent a preconfigured cluster from AWS. The service will be using is called Elastic Map Reduce and is basically a managed Hadoop cluster with optional Spark installation. To start an EMR cluster, log in to your AWS console, select EMR from services (it hides in the ‘Analytics’ section) and hit “Create cluster”. Make sure to select “Spark” in the “Applications” section and to select a key pair (create one if you don’t have any). If you create a cluster without a key pair, you won’t be able to use it!
It can take up to 15 minutes to create your cluster. In the meantime, take a look at the security groups to make sure that you can SSH into your master node and that you can access Spark Web UI:
- In the “Summary” tab, find the “Security and access” section and click on a link next to “Security group for Master”
- In the list that will appear, select the line that has “ElasticMapReduce-master” as its group name
- Click “Inbound”, then “Edit”
- Make sure that the following two rules are added
| Type | Protocol | Port Range | Source | Description |
|---|---|---|---|---|
| Custom TCP Rule | TCP | 22 | My IP | SSH for master |
| Custom TCP Rule | TCP | 18080 | My IP | Spark history server |
After the cluster gets active, you can SSH to the master node, and start your application from there
SUBMITTING YOUR APPLICATION TO THE EMR CLUSTER
The big moment has come, now we can submit our application to the cluster we just created. First you will need to upload your JAR file to the Spark master. Go to the “Summary” tab in your AWS console and click on the “SSH” link near the top. Copy the SSH command from the popup window into your terminal. It should look something like that:
ssh -i ~/Gosiaskeypair.pem hadoop@ec2-52-90-124-53.compute-1.amazonaws.comNow we need to edit this command, so that we can copy a file rather than SSH into the cluster. Change it into something like that:
scp -i ~/Gosiaskeypair.pem target/scala-2.11/talkingdataspark_2.11-0.1.jar \
hadoop@ec2-52-90-124-53.compute-1.amazonaws.com:
Note the colon at the end. It’s important. Assuming that you’re running it from your Spark application directory (where your build.sbt lives), this should copy your JAR file to the cluster. Now you can use the previous command to SSH into the Spark master:
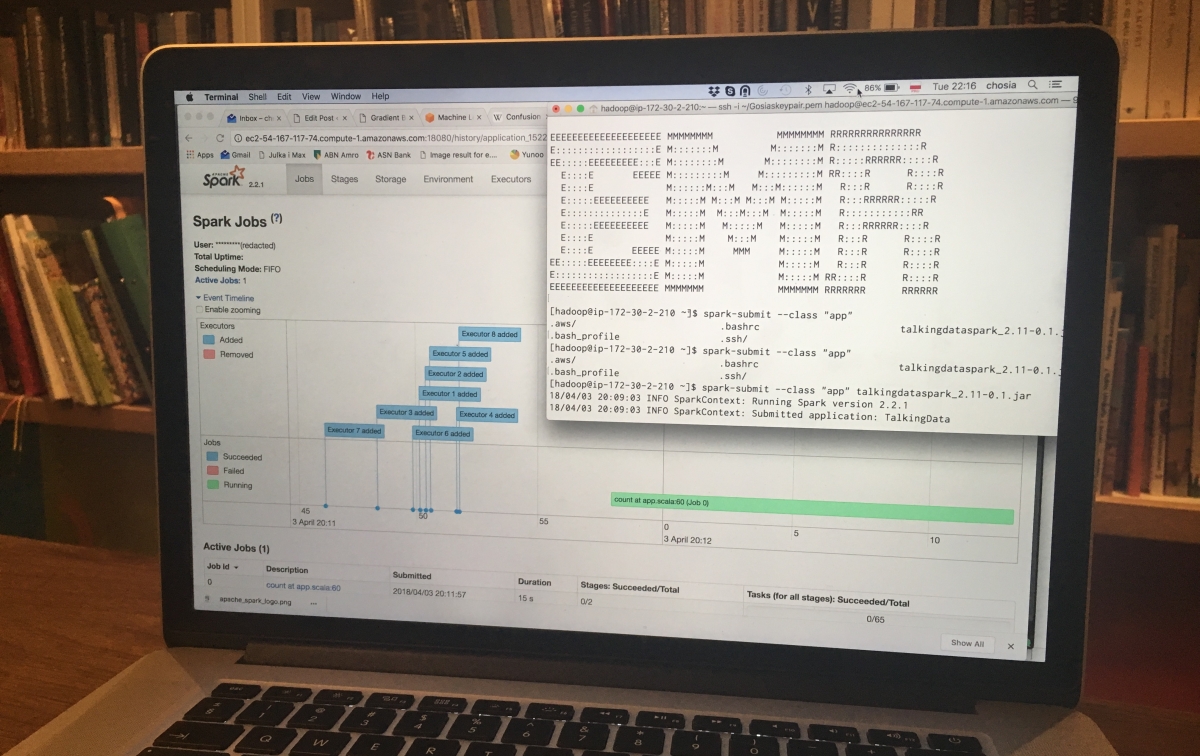
ssh -i ~/Gosiaskeypair.pem hadoop@ec2-52-90-124-53.compute-1.amazonaws.comTake a minute to admire the ASCII art :-).

Now you can finally submit your job by typing:
spark-submit --class "app" talkingdataspark_2.11-0.1.jar
Now just sit back and watch.
Or if you like more graphical output, point your browser to your_master_DNS:18080 to access Spark GUI with a lot of job statistics and execution graphs.
AND DID IT WORK?
And now the important question: did Spark solve my problem? The answer is unfortunately: not really. I hoped that by using Spark I could train my model in say 30 minutes, rather than many hours. But even though I scaled my cluster to 16 nodes, the algorithm was still very slow. The problem is that the size of the data I tried to use was not really that big (approximately 7GB, which is nothing for Spark) while the algorithm is quite complex. Trying to run complex algorithms in parallel on relatively small amounts of data causes a lot of communication and synchronisation overhead and reduces therefore the parallel efficiency of the cluster. Spark is great for performing relatively simple operations on your datasets, or perhaps for running such complex algorithms on very, very large datasets (we should expect runtime reductions from days to hours, not from hours to minutes, though), but not suitable for this particular problem. Before I go back to my original idea though – running a bunch of Python code on a large machine in AWS – I will try yet another AWS service: AWS Sagemaker.